Tuesday, May 10, 2016

Beginner Tutorial How To Combine Two Images In Photoshop

Image titled Combine Two Images in Adobe Photoshop Step 1

STEP 1 : Open the Adobe Photoshop CS5.1 and pick the alternatives to open board. Here's the Path to take after. Record - >New. Give the estimations of the determination precisely the amount you require. I have picked the qualities 800x600 Height and Width.

Image titled Combine Two Images in Adobe Photoshop Step 2

STEP 2 : When you canvas is open then tap on FILE- - >Place. Another pop up window would be open then select the record you need to consolidate with the other one.

Image titled Combine Two Images in Adobe Photoshop Step 3

STEP 3 : Presently put this document precisely where you need to put on the canvas. You can decrease the extent of the picture and change anyplace you need to put with simply utilize move and customize from mouse cursor. When you precisely put your picture where you need to place then do a right snap and select the choice PLACE picture would be spot and the conformity box would be expel or in the event that you need to cross out the picture as of now then snap CANCEL picture would be evacuate.

Image titled Combine Two Images in Adobe Photoshop Step 4


STEP 4 : Presently its opportunity to add second picture you need to join with your first picture. Rehash step 2 again to put the second picture and once you pick the second picture then modify that second picture with mouse courser as you have done in step three for your first picture.

Image titled Combine Two Images in Adobe Photoshop Step 5

STEP 5 : When you have finished with conformity quite recently do a right tap on your second picture then your second picture would be spot in the principle canvas. presently both of pictures has been set on one canvas.

Image titled Combine Two Images in Adobe Photoshop Step 6

STEP 6 : Its opportunity to spare this canvas essentially go on FILE- - >SAVE. Another window would be pop and ask you the arrangement you need to spare and some pictures sizes you need to trade. you can spare the PSD position too in the event that you need to include some more work with this joined picture in Illustrator or whatever other programming. There would be numerous arrangements accessible.

Image titled Combine Two Images in Adobe Photoshop Step 7

STEP 7 : As soon you finished with recovery the picture. it would turn out and spare that area where you needed to spare. The photos is yours now.

Labels: , , , , , , ,

Monday, May 9, 2016

How To Create A Fake Shadow In Photoshop

In this weeks instructional exercise, I will demonstrate to you industry standards to apply a fake drop shadow to your pictures.

First off, we will create a duplicate layer, then we will select our quick selection tool and create a quick mask. Once we’ve done that, we will create another new layer, and again use the quick selection tool to create a selection around the person. We will then fill our selection and transform it into our new shadow position. Lastly we will add a blur effect and refine or shadow layer. Once we are done we create a group and organize or PSD file.

Quick reminder: Use your Cmd on Mac or Ctrl on Windows keys when moving your anchor points from your transformation box.

Before


Fake Shadow


Aftre


Fake Shadow

Labels: , , , , , ,

Sunday, May 8, 2016

Photoshop Clipping Mask Easy Tutorial .

1.  The first thing you’ll need to do to create the shape you wish to mask with.  We created some vector text using the horizontal type tool.

horizontal type tool

2.  Next you’ll need to import the image you want to clip.  You can do this by opening your image in photoshop, hitting ctrl+a to select all, ctrl+c to copy, and then going to your working file tab and hitting ctrl+v to paste.
3.  After pasting you’ll have a new layer. Make sure that your image is ordered above the text (or shape) layer.
clipping mask layer order

4.  With the image layer selected, go to Layer > Create Clipping Mask.  Alternatively, you can use ctrl+alt+g as a shortcut.  If you plan on having a bunch of images to shape, the shortcut will save you a ton of time.  Make sure to use it!

create clipping mask

5.  Now your image has been clipped to your shape and you can manipulate the image layer or shape layer independently!  Trust me, being able to edit these after the first draft of your design will be a huge lifesaver in the long run.  One thing I’ve learned is that things are rarely right on the first time.   Pay yourself forward.
clipped text in photoshop


Labels: , , , , , , , , ,

Saturday, May 7, 2016

How To Create Action In Photoshop

photoshop action                                  
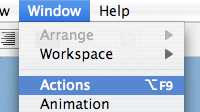
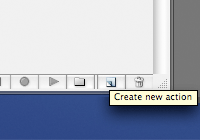
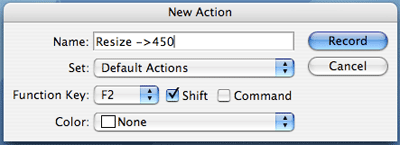
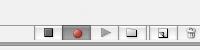
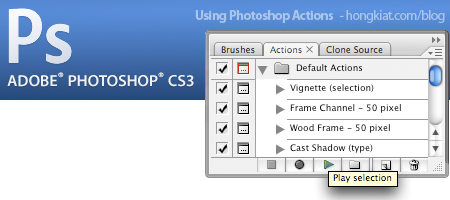
Photoshop activity is an extremely helpful form in capacity to make redid system to rehash dull and tedious Photoshop assignment. In this post, we are going to take a gander at how to make a basic Photoshop activity with a situation as case.

Here's a situation: You have to resize (to littler) a picture, and in Photoshop here's the way we do it:

1. Document - > Image

2. Enter new Width/Height size

3. Click Ok

Suppose you have more pictures.

In the event that you have tones of pictures to resize or you need to perform the same activity the following day or somewhere in the vicinity. It's dull to rehash these strides. Photoshop Actions permits you to record the strides you perform and re-play with a single tick so you don't need to continue doing likewise over and over.

Utilizing Photoshop Actions


1. Open up a picture you need to resize and raise the Photoshop Actions board (Windows - > Actions)

photoshop action


2. At the base of Action board, click on the Create New Action catch
photoshop action

3. Redo the accompanying on the popup exchange box

photoshop action


Name: Give your activity a spellbinding name

Set: If you not wanting to arrange them, abandon it inside Default Actions

Capacity Key: Create an alternate way for your activity.

4. Click on Record and the catch beneath will turn red. Any activity you perform in Photoshop will be recorded.
photoshop action

With the Record mode on, begin altering your photograph. For our situation, lets resize the picture. Pick Image - > Image Size, enter 450 for width (or whatever other sizes), click Ok. Click on the record catch to kill the Record mode.
photoshop action

Your activity recorded ought to look something this way.

photoshop action

Testing the activity

Since you have an activity recorded, lets open up another picture that should be resize. This time, we'll simply hit the easy route key Shift F2, or tapping on the Play choice catch. You ought to have the capacity to resize in only a single tick.

To practice the use of Photoshop Actions, you can have a go at recording more intricate activities. Acing activities will help you perform alot of routine Photoshop assignments in shorter time. Have some good times.


http://www.hongkiat.com/blog/photoshop-tutorial-1-click-photo-editing-with-action/

Labels: , , , , , , , ,

Friday, May 6, 2016

How To Creating An Effective Watermark In Photoshop CS5

Initial phase in making your watermark you have to choose for yourself do you wish to utilize content or a picture, for example, your logo as the water. The procedure for changing over this to a watermark is the same however despite everything you need your assets prepared to go. What size is your watermark?

Open another record in Photoshop with a canvas size to suit your requirements yet ensure the foundation is set to straightforward. Include your content and logo pictures to this document how you need it set out.

Here is my illustration:
Watermark

Presently ensure everything is chosen and change it to dark ( I picked #666 as my shading) and change the opactiy of everything to half.

Watermark

Presently we have to include a slope and emblazon impact to your pictures. Again guaranteeing that all the unmistakable layers are chosen go impacts in the layers palette modify a slant and decorate to suit what you are after then hit OK and change the mix mode to hard light.

One tip to recollect is to ensure your watermark is not to enormous. You don't need it to be excessively tall or wide for the pictures you usually watermark.

When you are content with the last result spare the picture as your watermark.
Thank you showing this tutorial.

Labels: , , , , , ,

Thursday, May 5, 2016

Easy Background Erasing Tutorials In Photoshop

Background RemoveRemoving the background from a photograph can be a really tricky task, particularly if the subject you want to cut out has lots of hair, or if the background is exceedingly complex. Here, we take you through the process of removing a background from an image to help you overcome that challenge.

First, you'll need to open the image you wish to remove the background from in Adobe Photoshop. Here, I'm using a photograph I took of a giraffe at Colchester Zoo to demonstrate this technique, which has a very defined boundary between the bit we want to keep (the giraffe) and the background. For images with fine detail around what you want to cut out – such as hair – see our tutorial on how to cut out hair in Photoshop.

I'm using Adobe CC, but the background removal technique detailed here will work in Photoshop CS5 and above, though some elements may look slightly different.

Once you've chosen the image you want to remove the background from and opened it in Photoshop, you can move on to the first step.


Labels: , , ,

Wednesday, May 4, 2016

Easy Image Masking Tutorials In Photoshop

photo masking
photo masking before and after effects
Technique: 1: The Easiest


  1. Dispatch Photoshop in your gadget. Open the sought record in Photoshop from the document program menu. 
  2. Select the 'Enchantment Wand' device from the accessible devices at the left half of the window. On the other hand just squeeze (W) in your console to choose the enchantment wand device. 
  3. Click on the picture and drag the apparatus over the picture. It will naturally choose the essential object of the picture and encompass it with a choice. 
  4. Presently open the layer palette of the picture and make a copy layer of the picture. The first layer is now saved out of sight and the work will go on this copy layer. Click off the perceivability symbol of the foundation layer and it will be covered up. 
  5. Select the 'Foundation Copy Layer' and Press the "Erase" key of your console. Of course it is 'delete' in windows. It will erase the foundation of the picture. 
  6. On the off chance that you need to include another foundation then tap on 'Make a New Layer' at the base of the layer palette and make another layer and put your fancied shading in it. On the other hand you can glue any custom foundation in it as well. 


Technique 2: Make it More Perfect

Photograph covering should likewise be possible in another technique which is known as shading detachment. It requests a bt more aptitude to get the best possible photograph veiling out of shading isolating strategies. Be that as it may, once you are capable, it can do supernatural occurrences. It should be possible by working out the shading range box and utilizing the eye dropper device. Before long I will distribute another article with video instructional exercise on this.

Technique 3 – The Professional One

The expert technique for doing photograph concealing is utilizing Background Eraser instrument. In a word it is the best of all. In any case, genuinely it is for the Photoshop aces who will spend a considerable measure of aptitude and time behind this employment. This photograph covering results will be the best among the various strategies. Regardless of what different techniques you apply, there will be some foundation left in the last photograph covering. In any case, this eraser device evacuate every last bit of it. You can do it without anyone else's input on the off chance that you are a specialist. In any case, it will tedious that I need to say. On the other hand you may need to employ an expert planner. On the off chance that it sounds excessive, you can contact any online photograph altering organizations. It will spare you both your time and cash with incredible out put.

Much thanks to you for perusing. Trust it was full. Fill us in regarding whether there is any issue by reaching us.


http://clippingpathuk.com/blogpost/photo-masking/

Labels: , , , , , ,